2020年初夏版『自宅録画サーバー(全録)』の作り方
目次
2022年6月12日 新たな全録サーバーを作成しました。
『自宅録画サーバー(全録)』の作り方について紹介します。
今回紹介する手順は、『自宅録画サーバー(全録)』のための手順ですが、一部を変更することで自宅録画サーバーとしての手順としても使えます。
- ハードウェアの組立て
『自宅録画サーバー(全録)』の概要で紹介した、パーツを購入し組立てます。 - ソフトウェアのインストール
以下のソフトウェアを順番にインストールしていきます。
No. 項目 名前 備考 1 OS、前準備 CentOS、SELinuxの無効化 8.1(Gnome Desktop) 2 トランスコーダー ffmpeg 4.2.3 3 カードリーダ pcsc_scan 4 復号ライブラリ ARIB 5 チューナードライバ 非公式ドライバ
recpt1_px46 録画ディスク設定 7 録画制御 mirakurun 8 録画予約 epgstation ブラウザから利用 9 サーバー状態監視 munin ブラウザから利用 10 ファイルサービス samba Windowsから利用 11 リモートデスクトップ xrdp Windowsから利用 12 録画視聴 plex media server ブラウザから利用 13 システム管理 cockpit ブラウザから利用
01)OSのインストールと前準備
CentOS 8.1(1911)をインストールします。
詳細手順は、次の記事を参照してください。
CentOS 8.1(1911)を簡単にインストールする方法
追記(2020年8月14日)
CentOS8.2(2004)が2020年6月16日にリリースされました。
ソフトウェアの自動更新機能があるので、CentOS8.1も簡単にCentOS8.2にアップデートできます。
これから、インストールする方は、CentOS8.2ではじめた方がいいでしょう。
CentOS8.2のインストーラーは8GBを越えているので、SDメモリは16GBを用意してください。
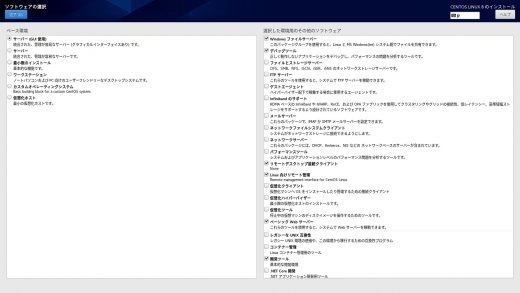
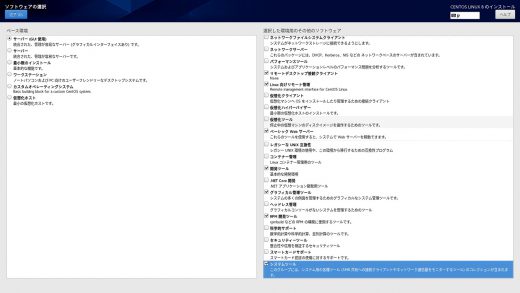
注意点は、「ソフトウェアの選択」です。
「サーバー(GUI使用)」を選択し、さらに画面右側の「選択した環境用のその他のソフトウェア」の中から以下も選択してください。
- Windowsファイルサーバー
- デバッグツール
- リモートデスクトップ接続クライアント
- Linux向けリモート管理
- ベーシックWebサーバー
- 開発ツール
- グラフィカル管理ツール
- RPM開発ツール
- システムツール
実際には、「開発ツール」だけでいいかもしれませんが、念の為9種類追加で入れてください。
ユーザーの作成で、フルネームを”EPGStation User”とすると、ユーザー名は”euser”となります。今回の手順説明では、ユーザー名は”euser”で行っていますので、別名を設定した場合は読み替えてください。
CentOS 8.1をインストール後、ユーザー名でログインします。そして、「端末(コンソール)」を使います。
<重要ポイント>CentOS 8.1では、上記手順でインストールした後、不便な点が2つあります。
- sudoが使えない。(これが使えないとスクリプトがきちんと動作しません。)
- かな漢字変換が使えない。
(1)sudoを使えるようにする。
su
gedit /etc/sudoers
最終行に以下を追記します。
euser ALL=(ALL) ALL
これで、euserでsudoが使えます。
(2)かな漢字変換を使えるようにする。
dnf -y install libkkc libkkc-data ibus-kkc
これで、かな漢字変換の設定ができるようになります。
『自宅録画サーバー(全録)』のソフトウェアをインストールするための前準備をします。
まず010-configというファイルを用意して、以下の内容を記述します。
# 010-config
# This file controls the state of SELinux on the system.
# SELINUX= can take one of these three values:
#     enforcing - SELinux security policy is enforced.
#     permissive - SELinux prints warnings instead of enforcing.
#     disabled - No SELinux policy is loaded.
SELINUX=disabled
# SELINUXTYPE= can take one of three two values:
#     targeted - Targeted processes are protected,
#     minimum - Modification of targeted policy. Only selected processes are protected.
#     mls - Multi Level Security protection.
SELINUXTYPE=targeted
上記ファイルは、SELinuxの無効化を設定します。
上記ファイルが用意できたら、以下のコマンドをコンソールで実行します。
#!/bin/sh
# 011-preset.sh
sudo systemctl stop firewalld
sudo systemctl disable firewalld
sudo cp ./010-config /etc/selinux/config
sudo dnf -y install epel-release
sudo dnf -y install dkms
sudo dnf -y --enablerepo=PowerTools install nkf
mkdir ~/src
mkdir ~/git
mkdir ~/test
sudo reboot
このシュルスクリプトでは、以下を行います。
- ファイヤーウォールの停止
- SELinuxの無効化
- EPELリポジトリの追加
- 環境設定
関連するディレクトリは以下のとおりです。
SELinuxを無効にするため、以下のconfigを変更する。
/etc/selinux
│   ├── config
│   └── targeted
インストールで使用するために、git、src、testなどのディレクトリを作成する。
/home
│ └── euser
│      ├── git
│      ├── src
│      ├── temp
│      ├── test
│      ├── thinclient_drives
02)ffmpegのインストール
TSファイルからmp4にトランスコードするffmpegをインストールします。
#!/bin/sh
# 021-ffmpeginstall.sh
sudo dnf config-manager --set-enabled PowerTools
sudo dnf config-manager --set-enabled epel-playground
sudo rpm -ivh https://download1.rpmfusion.org/free/el/rpmfusion-free-release-8.noarch.rpm
sudo dnf install ffmpeg
インストール後、バージョンを確認する。
CentOS 8では、ffmpegのバージョンは、4.2.3となる。
(このバージョンでは、QSVが使える可能性がある。)
$ ffmpeg -version
ffmpeg version 4.2.3 Copyright (c) 2000-2020 the FFmpeg developers
built with gcc 8 (GCC)
configuration: --prefix=/usr --bindir=/usr/bin --datadir=/usr/share/ffmpeg --docdir=/usr/share/doc/ffmpeg --incdir=/usr/include/ffmpeg --libdir=/usr/lib64 --mandir=/usr/share/man --arch=x86_64 --optflags='-O2 -g -pipe -Wall -Werror=format-security -Wp,-D_FORTIFY_SOURCE=2 -Wp,-D_GLIBCXX_ASSERTIONS -fexceptions -fstack-protector-strong -grecord-gcc-switches -specs=/usr/lib/rpm/redhat/redhat-hardened-cc1 -specs=/usr/lib/rpm/redhat/redhat-annobin-cc1 -m64 -mtune=generic -fasynchronous-unwind-tables -fstack-clash-protection -fcf-protection' --extra-ldflags='-Wl,-z,relro -Wl,-z,now -specs=/usr/lib/rpm/redhat/redhat-hardened-ld ' --extra-cflags=' ' --enable-libopencore-amrnb --enable-libopencore-amrwb --enable-libvo-amrwbenc --enable-version3 --enable-bzlib --disable-crystalhd --enable-fontconfig --enable-frei0r --enable-gcrypt --enable-gnutls --enable-ladspa --enable-libaom --enable-libdav1d --enable-libass --enable-libbluray --enable-libcdio --enable-libdrm --enable-libjack --enable-libfreetype --enable-libfribidi --enable-libgsm --enable-libmp3lame --enable-nvenc --enable-openal --enable-opencl --enable-opengl --enable-libopenjpeg --enable-libopus --enable-libpulse --enable-librsvg --enable-libsrt --enable-libsoxr --enable-libspeex --enable-libssh --enable-libtheora --enable-libvorbis --enable-libv4l2 --enable-libvidstab --enable-libvmaf --enable-version3 --enable-vapoursynth --enable-libvpx --enable-libx264 --enable-libx265 --enable-libxvid --enable-libzimg --enable-libzvbi --enable-avfilter --enable-avresample --enable-libmodplug --enable-postproc --enable-pthreads --disable-static --enable-shared --enable-gpl --disable-debug --disable-stripping --shlibdir=/usr/lib64 --enable-libmfx --enable-runtime-cpudetect
libavutil      56. 31.100 / 56. 31.100
libavcodec     58. 54.100 / 58. 54.100
libavformat    58. 29.100 / 58. 29.100
libavdevice    58.  8.100 / 58.  8.100
libavfilter     7. 57.100 /  7. 57.100
libavresample   4.  0.  0 /  4.  0.  0
libswscale      5.  5.100 /  5.  5.100
libswresample   3.  5.100 /  3.  5.100
libpostproc    55.  5.100 / 55.  5.100
関連するディレクトリは、以下のとおりです。
ffmpegは以下の場所にインストールされます。
/usr
│ └── bin
│     └── ffmpeg
03)カードリーダーのインストール
カードリーダーのドライバーをインストールする。
#!/bin/sh
# 031-installcardreader.sh
sudo dnf -y install ccid pcsc-lite-devel
sudo dnf -y install perl-ExtUtils-MakeMaker
cd ~/src
wget http://search.cpan.org/CPAN/authors/id/W/WH/WHOM/pcsc-perl-1.4.14.tar.bz2
tar xvjf pcsc-perl-1.4.14.tar.bz2
cd pcsc-perl-1.4.14
perl Makefile.PL
make
sudo make install
cd ~/src
wget https://launchpad.net/ubuntu/+archive/primary/+sourcefiles/pcsc-tools/1.5.5-1/pcsc-tools_1.5.5.orig.tar.bz2
tar xvjf pcsc-tools_1.5.5.orig.tar.bz2
cd pcsc-tools-1.5.5/
./configure
make
sudo make install
sudo systemctl enable pcscd
sudo systemctl start pcscd
pcsc_scan
04)ARIB25のインストール
復号ライブラリARIB25をインストールする。
#!/bin/sh
# 041-installarib25.sh
sudo dnf -y install cmake
cd ~/git
git clone https://github.com/stz2012/libarib25.git
cd libarib25/
cmake .
make
sudo make install
sudo sh -c 'echo /usr/local/lib64 > /etc/ld.so.conf.d/usr-local-lib.conf'
sudo ldconfig
05)TVチューナー用ドライバと録画コマンドrecpt1のインストール
TVチューナーPX-Q3PE4とPX-W3PE4のための非公式専用ドライバをインストールする。
#!/bin/sh
# 051-px4driver-1.sh
cd ~/git
git clone https://github.com/nns779/px4_drv
cd px4_drv/fwtool/
make
wget http://plex-net.co.jp/plex/pxw3u4/pxw3u4_BDA_ver1x64.zip
unzip pxw3u4_BDA_ver1x64.zip
sudo ./fwtool pxw3u4_BDA_ver1x64/PXW3U4.sys it930x-firmware.bin
sudo cp -p it930x-firmware.bin /lib/firmware/
ドライバをビルドするためにdkmsコマンドを使用します。
同じディレクトリに050-dkms.installというファイルを置いて、以下の内容を記述してください。
. ./dkms.conf
cp -a `pwd` /usr/src/$PACKAGE_NAME-$PACKAGE_VERSION
dkms add -m $PACKAGE_NAME -v $PACKAGE_VERSION
dkms build -m $PACKAGE_NAME -v $PACKAGE_VERSION
dkms install -m $PACKAGE_NAME -v $PACKAGE_VERSION
さらに、050-dkms.uninstallというファイルを置いて、以下の内容を記述してください。
. ./dkms.conf
dkms remove -m $PACKAGE_NAME -v $PACKAGE_VERSION --all
rm -vrf /usr/src/$PACKAGE_NAME-$PACKAGE_VERSION
上記ファイルが用意できたら、以下のコマンドを実行します。
#!/bin/sh
# 052-px4driver-2.sh
cp ./050-dkms.install ~/git/px4_drv/dkms.install
cp ./050-dkms.uninstall ~/git/px4_drv/dkms.uninstall
cd ~/git/px4_drv
sudo bash dkms.install
関連するディレクトリは、以下のとおりです。
地上波6チャンネル、BS6チャンネル、計12チャンネル
(PX-Q3PE4が1枚ならpx4video7まで、PX-W3PE4が1枚ならpx4video3まで)
/dev
│  ├── px4video0
│  ├── px4video1
│  ├── px4video2
│  ├── px4video3
│  ├── px4video4
│  ├── px4video5
│  ├── px4video6
│  ├── px4video7
│  ├── px4video8
│  ├── px4video9
│  ├── px4video10
│  └── px4video11
次に、recpt1をインストールします。
#!/bin/sh
# 053-recpt-1.sh
cd ~/src
wget http://plex-net.co.jp/download/linux/Linux_Driver.zip
unzip Linux_Driver.zip
cd Linux_Driver/MyRecpt1/MyRecpt1/recpt1
sed -i".org" 's/-DTV/video/g' pt1_dev.h
次に、以下の050-Make.iniファイルを用意します。
DESTDIR =
prefix = @prefix@
exec_prefix = @exec_prefix@
bindir = @bindir@
CC = @CC@
TARGET = recpt1_px4
TARGET2 = recpt1ctl_px4
TARGET3 = checksignal_px4
TARGETS = $(TARGET) $(TARGET2) $(TARGET3)
RELEASE_VERSION = "c8688d7d6382_with_http_server_RC4 by stz2012"
CPPFLAGS = -I../driver -Wall -D_LARGEFILE_SOURCE -D_FILE_OFFSET_BITS=64
CFLAGS = -O2 -g -pthread
LIBS = @LIBS@
LIBS2 = -lm
LIBS3 = -lpthread -lm
LDFLAGS =
OBJS = recpt1.o decoder.o mkpath.o tssplitter_lite.o recpt1core.o asicen_dtv.o
OBJS2 = recpt1ctl.o recpt1core.o asicen_dtv.o
OBJS3 = checksignal.o recpt1core.o asicen_dtv.o
OBJALL = $(OBJS) $(OBJS2) $(OBJS3)
DEPEND = .deps
all: $(TARGETS)
clean:
rm -f $(OBJALL) $(TARGETS) $(DEPEND) version.h
distclean: clean
rm -f Makefile config.h config.log config.status
maintainer-clean: distclean
rm -fr configure config.h.in aclocal.m4 autom4te.cache *~
$(TARGET): $(OBJS)
$(CC) $(LDFLAGS) -o $@ $(OBJS) $(LIBS)
$(TARGET2): $(OBJS2)
$(CC) $(LDFLAGS) -o $@ $(OBJS2) $(LIBS2)
$(TARGET3): $(OBJS3)
$(CC) $(LDFLAGS) -o $@ $(OBJS3) $(LIBS3)
$(DEPEND): version.h
$(CC) -MM $(OBJS:.o=.c) $(OBJS2:.o=.c) $(CPPFLAGS) > $@
version.h:
revh="`git rev-list HEAD | wc -l 2> /dev/null`"; \
if [ -n "$$revh" ] && [ "$$revh" != "0" ] ; then \
echo "const char *version = \"rev.$$revh by stz2012\";" > $@; \
else \
echo "const char *version = \"$(RELEASE_VERSION)\";" > $@; \
fi
install: $(TARGET)
install -m 755 $(TARGETS) $(DESTDIR)$(bindir)
-include .deps
以下のコマンドを実行し、recpt1をインストールします。
#!/bin/sh
# 054-recpt-2.sh
cp ./050-Makefile.in ~/src/Linux_Driver/MyRecpt1/MyRecpt1/recpt1/Makefile.in
cd ~/src/Linux_Driver/MyRecpt1/MyRecpt1/recpt1/
make clean
sh ./configure --enable-b25
make
sudo make install
recpt1がインストールできたことを確認するため、テストを行います。
#!/bin/sh
# 055-rectest.sh
cd ~/test
recpt1_px4 --b25 --strip 27 10 test1.ts
recpt1_px4 --b25 --strip BS15_0 10 test2.ts
実行後、testディレクトリの中にtest1.tsとtest2.tsが作成できれば、OKです。
関連するディレクトリは、以下のとおりです。
/usr/local
├── bin
│   └── recpt1
06)録画ディスクの作成
以下の構成でディレクトリを作成します。
/mnt
├── data1
│   ├── nhk
│   ├── ntv
│   ├── tbs
│   ├── temp
│   └── tv
└── data2
│   ├── asahi
│   ├── fuji
│   └── tokyo
ディレクトリを作成するコマンドです。
#!/bin/sh
# 061-makefolderdata1.sh
for x in "$@"
do
sudo mkdir /mnt/data1/$x
done
#!/bin/sh
# 062-makefolderdata2.sh
for x in "$@"
do
sudo mkdir /mnt/data2/$x
done
以下のように実行します。
sh 061-makefolderdata1.sh nhk ntv tbs
sh 062-makefolderdata2.sh asahi fuji tokyo
以下のコマンドでアクセス権を設定します。
2台のディスクを使用しているので、data2のディレクトリはdata1にリンクしています。
#!/bin/sh
# 063-makefolderset.sh
sudo mkdir /mnt/data1/tv
sudo mkdir /mnt/data1/temp
sudo chmod -R 777 /mnt/data1
sudo chown -R euser:euser /mnt/data1
sudo chmod -R 777 /mnt/data2
sudo chown -R euser:euser /mnt/data2
ln -s /mnt/data2/fuji /mnt/data1/fuji
ln -s /mnt/data2/asahi /mnt/data1/asahi
ln -s /mnt/data2/tokyo /mnt/data1/tokyo
これで、EPGStationをインストールする準備ができました。
07)mirakurunのインストール
録画をコントロールするmirakurunをインストールします。
#!/bin/sh
# 071-installmirakurun.sh
sudo curl -sL https://rpm.nodesource.com/setup_12.x | sudo bash -
sudo dnf -y install nodejs
sudo node -v
sudo npm install pm2 -g
sudo npm install mirakurun -g --unsafe --production
sudo npm install rivarun -g
sudo npm install arib-b25-stream-test -g --unsafe
sudo pm2 status
ここで、mirakurunの設定を行います。
関連するディレクトリは、以下のとおりです。
/usr/local
├── etc
│       └── mirakurun
│        ├── channels.yml
│        ├── server.yml
│        └── tuners.yml
ここで、tuners.ymlとchannels.ymlを編集します。
ファイルを入れ替えてもうまくいかないので、できたファイルを編集します。
rootでgeditを使います。
su
gedit tuners.yml
gedit channels.yml
exit
tuners.ymlは、以下のように書き換えます。
- name: PX4-S1
types:
- BS
- CS
command: /usr/local/bin/recpt1_px4 --device /dev/px4video0 --lnb 15 <channel> - -
decoder: arib-b25-stream-test
isDisabled: false

- name: PX4-S2
types:
- BS
- CS
command: /usr/local/bin/recpt1_px4 --device /dev/px4video1 --lnb 15 <channel> - -
decoder: arib-b25-stream-test
isDisabled: false

- name: PX4-T1
types:
- GR
command: /usr/local/bin/recpt1_px4 --device /dev/px4video2 <channel> - -
decoder: arib-b25-stream-test
isDisabled: false

- name: PX4-T2
types:
- GR
command: /usr/local/bin/recpt1_px4 --device /dev/px4video3 <channel> - -
decoder: arib-b25-stream-test
isDisabled: false

- name: PX4-S3
types:
- BS
- CS
command: /usr/local/bin/recpt1_px4 --device /dev/px4video4 --lnb 15 <channel> - -
decoder: arib-b25-stream-test
isDisabled: false

- name: PX4-S4
types:
- BS
- CS
command: /usr/local/bin/recpt1_px4 --device /dev/px4video5 --lnb 15 <channel> - -
decoder: arib-b25-stream-test
isDisabled: false

- name: PX4-T3
types:
- GR
command: /usr/local/bin/recpt1_px4 --device /dev/px4video6 <channel> - -
decoder: arib-b25-stream-test
isDisabled: false

- name: PX4-T4
types:
- GR
command: /usr/local/bin/recpt1_px4 --device /dev/px4video7 <channel> - -
decoder: arib-b25-stream-test
isDisabled: false

- name: PX4-S5
types:
- BS
- CS
command: /usr/local/bin/recpt1_px4 --device /dev/px4video8 --lnb 15 <channel> - -
decoder: arib-b25-stream-test
isDisabled: false

- name: PX4-S6
types:
- BS
- CS
command: /usr/local/bin/recpt1_px4 --device /dev/px4video9 --lnb 15 <channel> - -
decoder: arib-b25-stream-test
isDisabled: false

- name: PX4-T5
types:
- GR
command: /usr/local/bin/recpt1_px4 --device /dev/px4video10 <channel> - -
decoder: arib-b25-stream-test
isDisabled: false

- name: PX4-T6
types:
- GR
command: /usr/local/bin/recpt1_px4 --device /dev/px4video11 <channel> - -
decoder: arib-b25-stream-test
isDisabled: false
channels.ymlは、東京在住で、無料放送だけならば以下の設定で大丈夫です。
- name: NHK総合・東京
  type: GR
  channel: '27'

- name: NHK Eテレ東京
  type: GR
  channel: '26'

- name: 日本テレビ
  type: GR
  channel: '25'

- name: テレビ朝日
  type: GR
  channel: '24'

- name: TBS
  type: GR
  channel: '22'

- name: テレビ東京
  type: GR
  channel: '23'

- name: フジテレビジョン
  type: GR
  channel: '21'

- name: TOKYO MX
  type: GR
  channel: '20'

- name: 放送大学
  type: GR
  channel: '28'
  isDisabled: true

- name: NHK BS1
  type: BS
  channel: BS15_0
  serviceId: 101

- name: NHK BS1 (サブ)
  type: BS
  channel: BS15_0
  serviceId: 102

- name: NHK BSプレミアム
  type: BS
  channel: BS3_1
  serviceId: 103

- name: NHK BSプレミアム (サブ)
  type: BS
  channel: BS3_1
  serviceId: 104

- name: BS日テレ
  type: BS
  channel: BS13_0
  serviceId: 141

- name: BS日テレ (サブ)
  type: BS
  channel: BS13_0
  serviceId: 142

- name: BS朝日
  type: BS
  channel: BS01_0
  serviceId: 151

- name: BS朝日 (サブ)
  type: BS
  channel: BS01_0
  serviceId: 152

- name: BS-TBS
  type: BS
  channel: BS01_1
  serviceId: 161

- name: BSテレ東
  type: BS
  channel: BS1_2
  serviceId: 171

- name: BSフジ
  type: BS
  channel: BS13_1
  serviceId: 181

- name: WOWOWプライム
  type: BS
  channel: BS03_0
  serviceId: 191
  isDisabled: false

- name: WOWOWライブ
  type: BS
  channel: BS05_0
  serviceId: 192
  isDisabled: false

- name: WOWOWシネマ
  type: BS
  channel: BS05_1
  serviceId: 193
  isDisabled: false

- name: スター・チャンネル1
  type: BS
  channel: BS09_1
  serviceId: 200
  isDisabled: true

- name: スター・チャンネル2
  type: BS
  channel: BS15_1
  serviceId: 201
  isDisabled: true

- name: スター・チャンネル3
  type: BS
  channel: BS15_1
  serviceId: 202
  isDisabled: true

- name: BS11
  type: BS
  channel: BS09_0
  serviceId: 211

- name: BS12トゥエルビ
  type: BS
  channel: BS09_2
  serviceId: 222

- name: 放送大学BS1
  type: BS
  channel: BS11_2
  serviceId: 231

- name: 放送大学BS2
  type: BS
  channel: BS11_2
  serviceId: 232

- name: 放送大学BS3
  type: BS
  channel: BS11_2
  serviceId: 233
さらに、ログの設定で、070-mirakurunというファイルを作成します。
/usr/local/var/log/mirakurun.stdout.log
/usr/local/var/log/mirakurun.stderr.log
/{
  daily
  compress
  rotate 7
  missingok
  notifempty
}
ファイルの準備ができたら、設定を実行します。
#!/bin/sh
# 072-setmirakurun.sh
sudo pm2 install pm2-logrotate
sudo cp ./070-mirakurun /etc/logrotate.d/mirakurun
sudo mirakurun stop
sudo npm update rivarun -g
sudo npm install mirakurun@latest -g --unsafe --production
sudo mirakurun start
mirakurunがきちんとインストールされたか、以下のスクリプトで確認します。
#!/bin/sh
# 073-testmirakurun.sh
rivarun --list | sed 's/},/},\n/g'
rivarun --list | sed 's/},/},\n/g'  | grep -v serviceId
rivarun --b25 --sid 1024 --ch GR/27 15 ~/test/test11.ts
rivarun --b25 --mirakurun localhost:40772 --sid 1024 --ch GR/27 15 ~/test/test12.ts
testディレクトリの中にtest11.tsとtest12.tsが作成できれば、成功です。
08)EPGStationのインストール
EPGStationのルールで正規表現が使えないととても不便です。特にOR(|)が使えると便利です。mysplの後継のmariadbをインストールします。今回の全録サーバーでは、ルールは簡単なので正規表現を使う必要はありませんが、汎用性を考慮します。
#!/bin/sh
# 081-installmariadb.sh
sudo dnf -y install mariadb mariadb-server
sudo systemctl enable mariadb.service
sudo systemctl start mariadb.service
mysql_secure_installation
mysql -u root -p
上記スクリプトの最後の2つ
mysql_secure_installation
mysql -u root -p
の対応は手動で以下のように行います。
[euser]$ mysql_secure_installation

NOTE: RUNNING ALL PARTS OF THIS SCRIPT IS RECOMMENDED FOR ALL MariaDB
      SERVERS IN PRODUCTION USE!  PLEASE READ EACH STEP CAREFULLY!

In order to log into MariaDB to secure it, we'll need the current
password for the root user.  If you've just installed MariaDB, and
you haven't set the root password yet, the password will be blank,
so you should just press enter here.

Enter current password for root (enter for none):
OK, successfully used password, moving on...

Setting the root password ensures that nobody can log into the MariaDB
root user without the proper authorisation.

Set root password? [Y/n] Y
New password:
Re-enter new password:
Password updated successfully!
Reloading privilege tables..
 ... Success!


By default, a MariaDB installation has an anonymous user, allowing anyone
to log into MariaDB without having to have a user account created for
them.  This is intended only for testing, and to make the installation
go a bit smoother.  You should remove them before moving into a
production environment.

Remove anonymous users? [Y/n]
 ... Success!

Normally, root should only be allowed to connect from 'localhost'.  This
ensures that someone cannot guess at the root password from the network.

Disallow root login remotely? [Y/n]
 ... Success!

By default, MariaDB comes with a database named 'test' that anyone can
access.  This is also intended only for testing, and should be removed
before moving into a production environment.

Remove test database and access to it? [Y/n]
 - Dropping test database...
 ... Success!
 - Removing privileges on test database...
 ... Success!

Reloading the privilege tables will ensure that all changes made so far
will take effect immediately.

Reload privilege tables now? [Y/n]
 ... Success!

Cleaning up...

All done!  If you've completed all of the above steps, your MariaDB
installation should now be secure.

Thanks for using MariaDB!
mariaDBインストール後、データベースを作ります。
[euser]$mysql -u root -p
MariaDB [(none)]> CREATE DATABASE epgstation CHARACTER SET utf8;
MariaDB [(none)]> GRANT ALL ON epgstation.* TO epgstation@localhost IDENTIFIED BY 'mirakurun';
MariaDB [(none)]> SET GLOBAL expire_logs_days = 1;
mariadbがインストールできたら、EPGStationをインストールします。
#!/bin/sh
# 082-installepgstation.sh
cd ~
git clone https://github.com/l3tnun/EPGStation.git
cd EPGStation
npm install
npm run build
cp config/config.sample.json config/config.json
cp config/operatorLogConfig.sample.json config/operatorLogConfig.json
cp config/serviceLogConfig.sample.json config/serviceLogConfig.json
sudo npm install pm2 -g
sudo env PATH=$PATH:/usr/bin /usr/lib/node_modules/pm2/bin/pm2 startup systemd -u euser --hp /home/euser
pm2 start dist/server/index.js --name "epgstation"
pm2 save
ここで、EPGStationのconfig.jsonの変更とenc-libx-crf.shを追加します。
config.jsonの変更点は、以下のとおりです。
{
    "readOnlyOnce": false,
    "serverPort": "8888",
    "mirakurunPath": "http+unix://%2Fvar%2Frun%2Fmirakurun.sock/",
    "dbType": "mysql",
    "mysql": {
    "host": "localhost",
    "port": 3306,
    "user": "epgstation",
    "password": "mirakurun",
    "database": "epgstation",
    "connectTimeout": 20000,
    "connectionLimit": 10
     },
    "ffmpeg": "/usr/bin/ffmpeg",
    "ffprobe": "/usr/bin/ffprobe",

    "recorded": "/mnt/data1",
    "recordedTSDefaultDirectory": "/tv/",
    "recordedEncodeDefaultDirectory": "/temp/",
    "recordedFormat": "%TITLE%_%YEAR%-%MONTH%-%DAY%_%HOUR%%MIN%",

    "maxEncode": 3,

    "encode": [
        {
            "name": "crf22",
            "cmd": "/bin/bash %ROOT%/config/enc-libx-crf.sh 22 veryfast",
            "suffix": "-crf22.mp4",
            "default": true
        },
	{
            "name": "crf25s",
            "cmd": "/bin/bash %ROOT%/config/enc-libx-crf.sh 25 superfast",
            "suffix": "-crf25s.mp4"
        }
    ],
さらに、configディレクトリの中に、enc-libx-crf.shをおきます。
#!/bin/sh
# 080-enc-libx-crf.sh
# version 3.1 created on 2020-07-24 by simplelife0530
#
#
#時間測定サブプログラム
function setStartTime() {
start_time=`date +%s`
}
function getEndTime() {
end_time=`date +%s`
process_time=`expr ${end_time} - ${start_time}`
}
#
#ファイル名
file=${INPUT##*/}
filename1=${file%.*}
filename2=`echo "$filename1" | sed 's/ / /g'`
#
#パラメーターの設定
if [ $# = 2 ]
then
crfValue=${1}
presetValue=${2}
else
crfValue="23"
presetValue="veryfast"
fi
#ログファイルの設定
mkdir -p "./logs/transcode"
today=$(date "+%Y%m%d")
logExt=".log"
logFile="./logs/transcode/"$today$logExt
if [ ! -e $logFile ]; then
{
echo "ファイル名,CRF値,preset値,録画時間,圧縮時間,圧縮速度,ファイルサイズ,圧縮サイズ,圧縮率"
} &gt;&gt; $logFile
fi
#
#エンコード設定
inputPara=" -y -i "
videoCodec=" -preset ${presetValue} -c:v libx264"
videoOpt=" -crf ${crfValue} -f mp4"
audioCodec=" -c:a aac"
audioOpt=" -strict -2 -ar 48000 -ab 192k -ac 2"
advancedOpt=" -loglevel error "
#
command="$FFMPEG$inputPara\"$INPUT\"$videoCodec$videoOpt$audioCodec$audioOpt$advancedOpt\"$OUTPUT\""
#
#エンコード開始
setStartTime
eval ${command}
getEndTime
#
#エンコード終了
{
duration=`/usr/bin/ffprobe "$OUTPUT" -hide_banner -show_entries format=duration | sed -n 2p`
recordingTime=${duration#duration=}
compressSpeed=`echo "scale=2; ${recordingTime}/${process_time}" | bc`
inputFileSize=`ls -l "$INPUT" | awk '{ print $5; }'`
outputFileSize=`ls -l "$OUTPUT" | awk '{ print $5; }'`
compressionRate=`echo "scale=3; ${outputFileSize}/${inputFileSize}" | bc`
echo "${filename2},${crfValue},${presetValue},${recordingTime},${process_time},${compressSpeed},${inputFileSize},${outputFileSize},${compressionRate}"
} &gt;&gt; $logFile
exit
トランスコード結果のログは、EPGStationのlogs/transcodeディレクトリに保存されます。
上記080-config.jsonと080-enc-libx-crf.shを以下のスクリプトでコピーします。
#!/bin/sh
# 083-setepgstation.sh
cp 080-config.json ~/EPGStation/config/config.json
cp 080-enc-libx-crf.sh ~/EPGStation/config/enc-libx-crf.sh
EPGStationのディレクトリの一部。
/home/euser/EPGStation
├── config
├── data
│   ├── streamfiles
│   └── upload
├── dist
│   ├── client
│   ├── css
│   └── server
├── doc
├── html
├── icon
├── img
├── logs
│   ├── Operator
│   ├── Service
│   └── transcode
EPGStationのアップデートは、以下のコマンドで実行する。
#!/bin/sh
# 084-updateepgstation.sh
cd ~/EPGStation
git pull
npm update
npm update -D
npm run build
インストールが完了したら、ブラウザでアクセスする。
http://localhost:8888
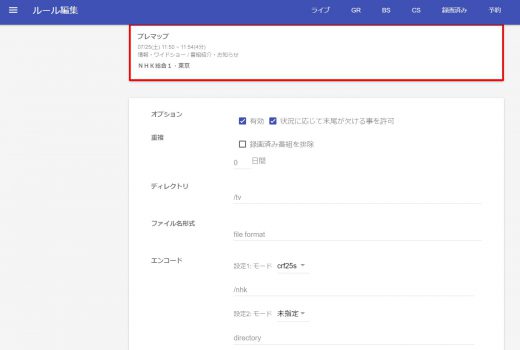
画面上部のメニューから、「ルール」を選択し、NHKならば以下の設定を行う。
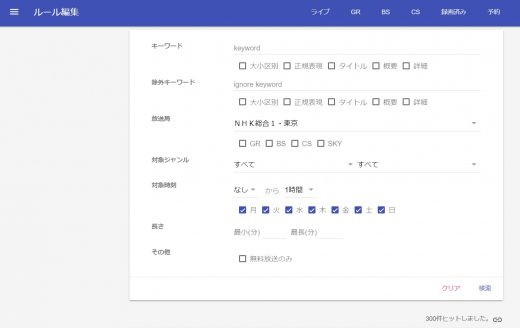
これで、NHKの全録が設定できました。
09)muninのインストール
CPUやHDDの温度管理をするために、muninを利用します。
#!/bin/sh
# 091-installmunin.sh
sudo dnf -y install httpd
sudo dnf -y install munin
muninに関連するディレクトリは以下のとおりです。
/etc
└── munin
    ├── munin-node.conf
    ├── munin.conf
    ├── plugin-conf.d
    │   └── munin-node
munin-node.confファイルを編集します。サーバーの名前がtvserverとすると
(修正前)
#host_name localhost.localdomain

(修正後)
host_name tvserver
設定が完了したら、実行を開始します。
#!/bin/sh
# 092-setmunin.sh
sudo systemctl start munin-node
sudo systemctl enable munin-node
sudo systemctl start httpd
sudo systemctl enable httpd
ブラウザでアクセスして確認します。
http://localhost/munin/
2020年8月23日追記 CentOS 8では、muninがきちんとインストールできません。
以下の対処をする必要があります。

/etc/cron.d の中にmuninというファイルを作り、以下の内容を記述します。
# Collect Munin data every five minutes, clean up once a day
MAILTO=root
*/5 * * * *  munin  /usr/bin/munin-cron
21  5 * * *  root   /usr/sbin/tmpwatch --ctime 24h /var/lib/munin/cgi-tmp
25  5 * * *  root   /usr/sbin/tmpwatch --ctime 30d /var/lib/munin --exclude /var/lib/munin/.ssh --exclude /var/lib/munin/cgi-tmp --exclude /var/lib/munin/plugin-state --exclude /var/lib/munin/rrdcached
10)sambaのインストール
windows 10からファイルを操作できるように、sambaをインストールします。
インストール前に、100-smb.configというファイルを作成します。
[global]
workgroup = workgroup
security = user
passdb backend = tdbsam
printing = cups
printcap name = cups
load printers = no
disable spoolss = yes

[tv]
comment = tv folder
path = /mnt/data1/tv
guest ok = yes
guest only = yes
writable = yes
create mode = 0777
directory mode = 0777

[nhk]
comment = nhk folder
path = /mnt/data1/nhk
guest ok = yes
guest only = yes
writable = yes
create mode = 0777
directory mode = 0777

[ntv]
comment = ntv folder
path = /mnt/data1/ntv
guest ok = yes
guest only = yes
writable = yes
create mode = 0777

[tbs]
comment = tbs folder
path = /mnt/data1/tbs
guest ok = yes
guest only = yes
writable = yes
create mode = 0777

[fuji]
comment = fuji folder
path = /mnt/data2/fuji
guest ok = yes
guest only = yes
writable = yes
create mode = 0777
directory mode = 0777

[asahi]
comment = asahi folder
path = /mnt/data2/asahi
guest ok = yes
guest only = yes
writable = yes
create mode = 0777

[tokyo]
comment = tokyo folder
path = /mnt/data2/tokyo
guest ok = yes
guest only = yes
writable = yes
create mode = 0777

[temp]
comment = temp folder
path = /mnt/data1/temp
guest ok = yes
guest only = yes
writable = yes
create mode = 0777
上記ファイルができたら、sambaをインストールします。
#!/bin/sh
# 101-installsamba.sh
sudo dnf -y install samba
sudo cp ./100-smb.config /etc/samba/smb.conf
sudo testparm
sudo pdbedit -a euser
sudo systemctl enable smb nmb
sudo systemctl start smb nmb
11)リモートデスクトップのインストール
リモートデスクトップをインストールする。
#!/bin/sh
# 111-installxrdp.sh
sudo dnf -y install xrdp tigervnc-server
sudo systemctl enable xrdp
sudo systemctl start xrdp
<注意点>CentOS8.1では、なぜかrootでないとリモートデスクトップにログインできません。
この問題だけが現在も解決できていません。(2020年07月24日)
12)plexmediaserverのインストール
plexmediaserverをダウンロードします。以下のサイトにアクセスします。
https://www.plex.tv/media-server-downloads/
以下の画面を表示されます。
上記画面で、「Choose Distribution」をクリックすると、以下のメニューが表示されます。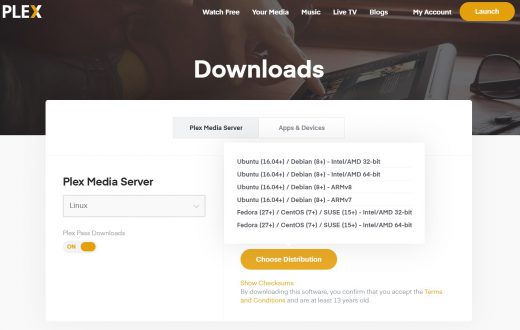
ここで、「Fedora (27+) / CentOS (7+) / SUSE (15+) – Intel/AMD 64-bit」を選択してダウンロードします。
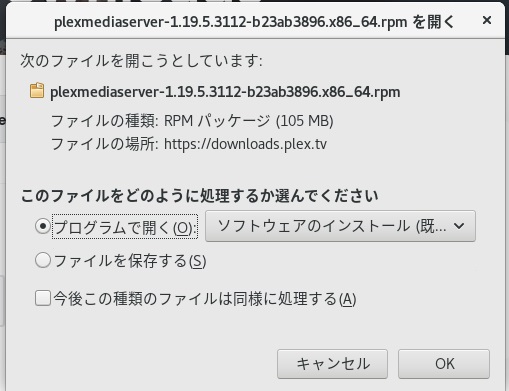
すると、以下の画面が表示されます。
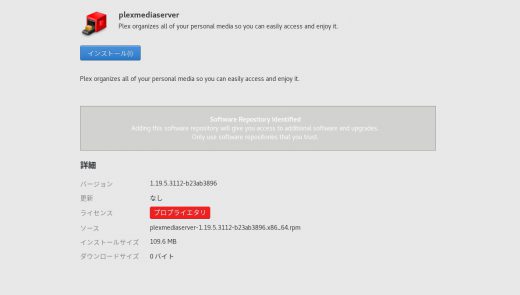
ここで、「OK」ボタンをクリックすると、以下の画面が表示される。
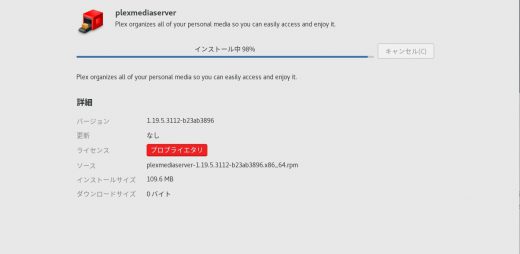
上記画面で、「インストール」ボタンをクリックすると、インストールが始まる。
インストールが完了したら、ブラウザでアクセスする。
http://localhost:32400/web/index.html#
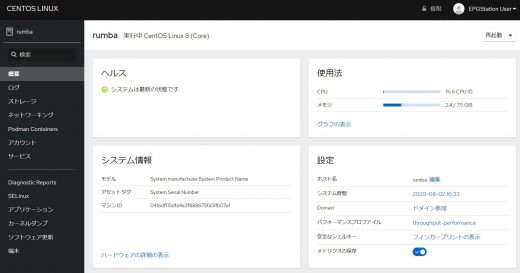
13)cockpitのインストール
システムの管理ツールとして、リモートでブラウザから使えるcockpitがあります。
これが非常に便利なので、これをインストールします。
#!/bin/sh
# 131-installcockpit.sh
sudo dnf -y install cockpit
sudo systemctl start cockpit
sudo systemctl enable cockpit.socket
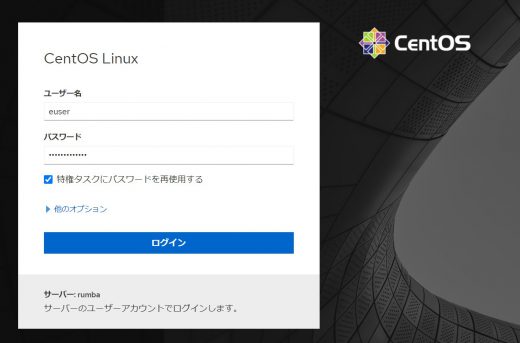
インストール後、別のPC(windows10)からブラウザ(chrome)でアクセスします。
https://PC名:9090
「ログイン」ボタンをクリックすると、以下の画面が表示されます。
14)最後に
今回紹介したファイルとスクリプトをまとめてダウンロードできるようにしました。







コメントを残す