TSからmp4への圧縮を一括実行するpythonスクリプト
ここで紹介するのは、録画で溜まったTSファイルをmp4ファイルへ圧縮してくれるpythonのスクリプトです。
CentOS 8.2の環境で、使用しています。今回は、ffmpegの性能を測定したスクリプトを簡単にして紹介します。
実行環境の準備
実際に確認した環境は、CentOS 8.2です。
ここで紹介するスクリプトを実行するために、以下の確認が必要です。
- python3が実行できる。
- ffmpegが実行できる。
- ffmpeg-pythonが使用できる。
(1) python3がインストールされているか確認する。
[euser@test ~]$ python3 -V
Python 3.6.8
(2) ffmpegがインストールされているか確認する。
[euser@test ~]$ ffmpeg -version
ffmpeg version 4.2.4 Copyright (c) 2000-2020 the FFmpeg developers
built with gcc 8 (GCC)
configuration: --prefix=/usr --bindir=/usr/bin --datadir=/usr/share/ffmpeg --docdir=/usr/share/doc/ffmpeg --incdir=/usr/include/ffmpeg --libdir=/usr/lib64 --mandir=/usr/share/man --arch=x86_64 --optflags='-O2 -g -pipe -Wall -Werror=format-security -Wp,-D_FORTIFY_SOURCE=2 -Wp,-D_GLIBCXX_ASSERTIONS -fexceptions -fstack-protector-strong -grecord-gcc-switches -specs=/usr/lib/rpm/redhat/redhat-hardened-cc1 -specs=/usr/lib/rpm/redhat/redhat-annobin-cc1 -m64 -mtune=generic -fasynchronous-unwind-tables -fstack-clash-protection -fcf-protection' --extra-ldflags='-Wl,-z,relro -Wl,-z,now -specs=/usr/lib/rpm/redhat/redhat-hardened-ld ' --extra-cflags=' ' --enable-libopencore-amrnb --enable-libopencore-amrwb --enable-libvo-amrwbenc --enable-version3 --enable-bzlib --disable-crystalhd --enable-fontconfig --enable-frei0r --enable-gcrypt --enable-gnutls --enable-ladspa --enable-libaom --enable-libdav1d --enable-libass --enable-libbluray --enable-libcdio --enable-libdrm --enable-libjack --enable-libfreetype --enable-libfribidi --enable-libgsm --enable-libmp3lame --enable-nvenc --enable-openal --enable-opencl --enable-opengl --enable-libopenjpeg --enable-libopus --enable-libpulse --enable-librsvg --enable-libsrt --enable-libsoxr --enable-libspeex --enable-libssh --enable-libtheora --enable-libvorbis --enable-libv4l2 --enable-libvidstab --enable-libvmaf --enable-version3 --enable-vapoursynth --enable-libvpx --enable-libx264 --enable-libx265 --enable-libxvid --enable-libzimg --enable-libzvbi --enable-avfilter --enable-avresample --enable-libmodplug --enable-postproc --enable-pthreads --disable-static --enable-shared --enable-gpl --disable-debug --disable-stripping --shlibdir=/usr/lib64 --enable-libmfx --enable-runtime-cpudetect
libavutil      56. 31.100 / 56. 31.100
libavcodec     58. 54.100 / 58. 54.100
libavformat    58. 29.100 / 58. 29.100
libavdevice    58.  8.100 / 58.  8.100
libavfilter     7. 57.100 /  7. 57.100
libavresample   4.  0.  0 /  4.  0.  0
libswscale      5.  5.100 /  5.  5.100
libswresample   3.  5.100 /  3.  5.100
libpostproc    55.  5.100 / 55.  5.100
(3)ffmpeg-pythonがインストールされているか確認する。
[euser@test ~]$ pip3 --version
pip 9.0.3 from /usr/lib/python3.6/site-packages (python 3.6)
[euser@test ~]$ pip3 install --user ffmpeg-python
Collecting ffmpeg-python
  Using cached https://files.pythonhosted.org/packages/d7/0c/56be52741f75bad4dc6555991fabd2e07b432d333da82c11ad701123888a/ffmpeg_python-0.2.0-py3-none-any.whl
Requirement already satisfied: future in /usr/local/lib/python3.6/site-packages (from ffmpeg-python)
Installing collected packages: ffmpeg-python
Successfully installed ffmpeg-python-0.2.0
[euser@test ~]$ pip3 list
DEPRECATION: The default format will switch to columns in the future. You can use --format=(legacy|columns) (or define a format=(legacy|columns) in your pip.conf under the [list] section) to disable this warning.
asn1crypto (0.24.0)
astroid (2.4.2)
bcc (0.11.0)
blivet (3.1.0)
Brlapi (0.6.7)
cffi (1.11.5)
chardet (3.0.4)
chrome-gnome-shell (0.0.0)
colorama (0.4.3)
configobj (5.0.6)
configshell-fb (1.1.25)
coverage (4.5.1)
crayons (0.4.0)
cryptography (2.3)
cupshelpers (1.0)
dbus-python (1.2.4)
decorator (4.2.1)
ethtool (0.14)
ffmpeg-python (0.2.0)
future (0.18.2)
以上で、python3、ffmpeg、ffmpeg-pythonが実行できることが確認できました。
スクリプトの説明
今回作成したスクリプトは、二つに分かれています。
- 実行制御スクリプト
crf値、preset値を設定して、実行を制御します。
今回は、1440×1080の解像度で、crf=22、preset=veryfastで1回処理します。 - 圧縮処理スクリプト
与えられたcrf値、preset値を用いて、ffmpegで圧縮を実行します。
また、logに圧縮速度・圧縮率を記録することができます。
(1)実行制御スクリプト(ts_to_mp4_1440.py)
#ts_to_mp4_1440.py
#created 2020-10-05 by simplelife0530

import trans_mp4
import pathlib
import os

# mode = 1440 or 1920
mode = 1440
in_dir = "./ts/"

# p_list = [veryfast]
# c_list 1440 = [22]
# c_list 1920 = [25]

p_list = ["veryfast"]
if mode == 1440:
    c_list = [22]
else: c_list = [25]
for preset in p_list:
    for crf in c_list:
        out_dir = "./mp4/" + str(crf) + "-" + preset + "/"
        os.makedirs(out_dir, exist_ok=True)
        f_list = pathlib.Path(in_dir).glob("*.ts")
        for f in f_list:
            trans_mp4.transcode(in_dir + f.name, out_dir + f.name.replace(".ts",".mp4"),crf,preset, "")
(2)圧縮処理スクリプト(trans_mp4.py)
#trans_mp4.py
#created 2020-03-30 by simplelife0530
#
import ffmpeg
import pathlib
import glob
import subprocess
import sys
import time
import json
import os
import datetime
import csv

def transcode(input_file,output_file,crfValue,presetValue,sValue):

    in_options = {}
    if not sValue:
        out_options = {'vcodec':'libx264', 'crf':crfValue, 'preset':presetValue}
        out_tag = str(crfValue) + "-" + presetValue
    else:
        out_options = {'vcodec':'libx264', 'crf':crfValue, 'preset':presetValue, 's':sValue}
        out_tag = str(crfValue) + "-" + presetValue + "-" + sValue

    log_path = "./log/"
    os.makedirs(log_path, exist_ok=True)
    today =  datetime.date.today()
    log_info = str(crfValue) + "-" + presetValue
    log_file = log_path + log_info + ".csv"
    header = ["ファイル名", "再生時間", "処理時間", "トランスコード速度", "入力ファイルサイズ", "出力ファイルサイズ", "圧縮率"]

    try:
        with open(log_file, 'x') as f:
            writer = csv.writer(f)
            writer.writerow(header)
    except FileExistsError:
        pass

    start = time.time()
    (
        ffmpeg
        .input(input_file, **in_options)
        .output(output_file, **out_options)
        .run()
    )
    elapsed_time = time.time() - start

    print("処理時間:{:.1f}".format(elapsed_time))
    file_name = os.path.basename(input_file)
    video_info = ffmpeg.probe(input_file)
    video_stream = next((stream for stream in video_info['streams'] if stream['codec_type'] == 'video'), None)
    video_duration = float(video_stream['duration'])
    print("再生時間:{:.1f}".format(video_duration))
    compression_speed = video_duration/elapsed_time
    print("速度:{:.1f}".format(compression_speed))
    input_filesize = os.path.getsize(input_file)
    output_filesize = os.path.getsize(output_file)
    print("入力サイズ:", input_filesize)
    print("出力サイズ:", output_filesize)
    compression_ratio = output_filesize/input_filesize
    print("圧縮率:{:.3f}".format(compression_ratio) )
    with open(log_file, 'a') as f:
        writer = csv.writer(f)
        writer.writerow([file_name, '{:.1f}'.format(video_duration), '{:.1f}'.format(elapsed_time), '{:.1f}'.format(compression_speed), input_filesize, output_filesize, '{:.3f}'.format(compression_ratio)])
実行制御スクリプトを変更することで、複数のcrf値、複数のpreset値で圧縮を行うことができます。
スクリプトの利用手順
本スクリプトを利用する手順は、以下のとおりです。
- TSファイルを用意する。
- TSファイルのサイズの1.5倍以上の容量が確保できるフォルダを作成する。
- 作成したフォルダの中に、tsという名前のフォルダを作成し、TSファイルを保存する。
- 二つのスクリプト ts_to_mp4_1440.pyとtrans_mp4.pyを作成したフォルダにコピーする。
- ターミナルを使って、ts_to_mp4.pyを実行する。
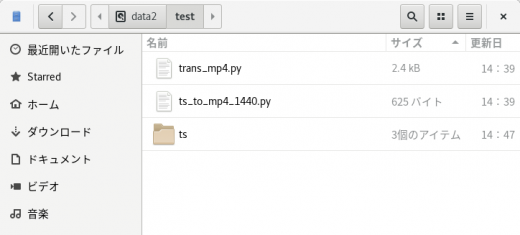
以下が、実行準備が整った状態。

ターミナルを開き、コマンドを入力する。
[euser@test test]$ ls
trans_mp4.py  ts  ts_to_mp4_1440.py

[euser@test test]$ python3 ts_to_mp4_1440.py
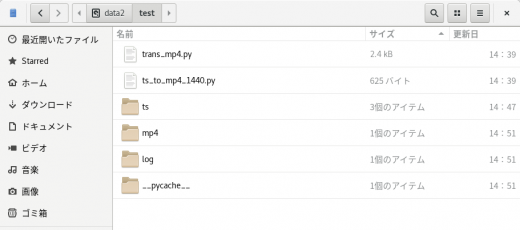
処理が終了した時の状態。

新たに、「mp4」、「log」、「–pycache–」の3つのフォルダができる。
「mp4」フォルダの中に、「22-veryfast」というフォルダがあり、その中に圧縮してできたmp4ファイルが保存されている。
「log」フォルダの中に、22-veryfast.csvというファイルがあり、ファイルごとの圧縮速度、圧縮率がcsv形式で記録されている。
テストスクリプト
スクリプトをもう一種類紹介します。こちらは、
3種類のpreset(superfast、veryfast、faster)、
5種類のcrf
(21、22、23、24、25)(1440×1080)、
(23、24、25、26、27)(1920×1080)
計15パターンで圧縮を実施します。
FFmpegの性能調査を実施する際に便利なスクリプトです。
test_mp4_1440.pyは、1440x1080の解像度の、主に地上波のTSファイルのためのスクリプトです。
#test_mp4_1440.py
#created 2020-09-12 by simplelife0530

import trans_mp4
import pathlib
import os

# mode = 1440 or 1920
mode = 1440
in_dir = "./ts/"

# p_list = [superfast, veryfast, faster]
# c_list 1440 = [21, 22, 23, 24, 25]
# c_list 1920 = [23, 24, 25, 26, 27]

p_list = ["veryfast"]
if mode == 1440:
    c_list = [21, 22, 23, 24, 25]
else: c_list = [23, 24, 25, 26, 27]
for preset in p_list:
    for crf in c_list:
        out_dir = "./mp4/" + str(crf) + "-" + preset + "/"
        os.makedirs(out_dir, exist_ok=True)
        f_list = pathlib.Path(in_dir).glob("*.ts")
        for f in f_list:
            trans_mp4.transcode(in_dir + f.name, out_dir + f.name.replace(".ts",".mp4"),crf,preset, "")
test_mp4_1920.pyは、1920x1080の解像度の、主にBSプレミアム、BS11、WOWOW向けのTSファイルのためのスクリプトです。
#test_mp4_1920.py
#created 2020-09-12 by simplelife0530

import trans_mp4
import pathlib
import os

# mode = 1440 or 1920
mode = 1920
in_dir = "./ts/"

# p_list = [superfast, veryfast, faster]
# c_list 1440 = [21, 22, 23, 24, 25]
# c_list 1920 = [23, 24, 25, 26, 27]

p_list = ["veryfast"]
if mode == 1440:
    c_list = [21, 22, 23, 24, 25]
else: c_list = [23, 24, 25, 26, 27]
for preset in p_list:
    for crf in c_list:
        out_dir = "./mp4/" + str(crf) + "-" + preset + "/"
        os.makedirs(out_dir, exist_ok=True)
        f_list = pathlib.Path(in_dir).glob("*.ts")
        for f in f_list:
            trans_mp4.transcode(in_dir + f.name, out_dir + f.name.replace(".ts",".mp4"),crf,preset, "")
スクリプトのダウンロード
スクリプトは、以下からダウンロードできる。


コメントを残す